Having covered the 40 & 82 in the previous post, I'll now cover the Austrains 41 and Auscision 43, so lets jump right in.
But first, a word from our sponsors ...
Before I start, for those that are interested, I thought I might outline my, ummm, 'thought process' in trying to figure out what the PCB 'wiring' diagram is so that I can figure out what to cut and what to solder to get the result I'm after , and seeing the 43 requires modification to only one lightboard I'll use that one as the example, so here goes a brief explanation - but be aware there are probably better ways, this is just my way, and for those not interested then just skip to the next section.
I start by taking a couple of photos under a light, and if needed move the PCB to get the reflection of the traces, I can then enlarge these photos as needed to see quite clearly the components and traces/tracks on the lightboard. I then draw an outline of the PCB board and then draw the various components (LEDs & Resistors) onto it, then I draw on the traces. If the PCB has been painted (some are, some aren't) which can make the traces difficult to see, then to enable to see the traces on the PCB I generally move the PCB under a light to see the reflection of the light on the trace, the 2 photos below are a couple of examples of the light reflecting off the board and thus making the traces a little more visible.


And the below is a couple of sketches of the lightboard with the traces drawn onto a piece of paper, drawing on both sides, kind of like superimposing one surface onto the other, I generally lay the paper on say a computer screen so I can see what's been drawn on one side and then draw over the top so both sides line up - I use a pencil for this step so as to not put too much pressure and damage the computer screen. One side has the LEDS, the other the Resistors, these drawings also show the 2 plated through holes (A & B) and the traces I cut - please note that the right hand side drawing has been flipped so that it is in the same orientation as the left hand drawing.


Using these photos and the diagrams I then try to figure out what power is fed to where and from what feed wire, so using the Red LED as an example, the power comes in via the Brown wire on the Bottom Right Pad in the drawing on the Left Hand Side, travels via a trace to a resistor, from the resistor it goes to the plated through hole 'A' to the other side of the board (the Right Hand side drawing) and travels via another trace to the Red LED, from there the feed goes via another trace which joins the Red and white Marker LEDs and then a trace to the Pad (which is cut, as indicated by the red line, as part of the modification) and exits via the (original) yellow wire on the Bottom Left Hand Pad in the drawing on the Right Hand Side, pretty simple really :-)
Austrains 41
Only because 41 comes before 43.

First thing is to remove the body from the chassis, this done by simply removing the 2 screws near the fuel tank, and then the body simply slides off the chassis, there is no need to remove the couplers.
Bogies - I did not rewire as I thought the wiring looked OK - I did not think the wires to the bogies looked to thick & was fairly flexible.

 |
| Unmodified chassis |
Light boards - these are at either end of the chassis and I think have to be retained because the springs make contact with the light boards on the round silver pads to provide power to the headlight. They also need to be modified so the white markers can work independently to the headlights, so lets see what needs to be modified.
As mentioned there are 2 main boards on the chassis, one board has the DCC 8 pin plug, the other end just has the light connections, both boards need to be modified, the round silver pads are the pads that the springs in the body make contact with to provide power to the headlights.
The modifications consist of basically cutting traces and soldering wires to the traces.
Board 1
I'll start with the easiest board to modify which is the board that does not have the 8 pin plug. This is simply a matter of cutting the trace as shown in the below photo of the underside of the board and soldering a wire as shown in the below photos
 |
| Underside of lightboard showing trace and soldered wire |
 |
| Underside of lightboard with cuts and soldered wire marked |
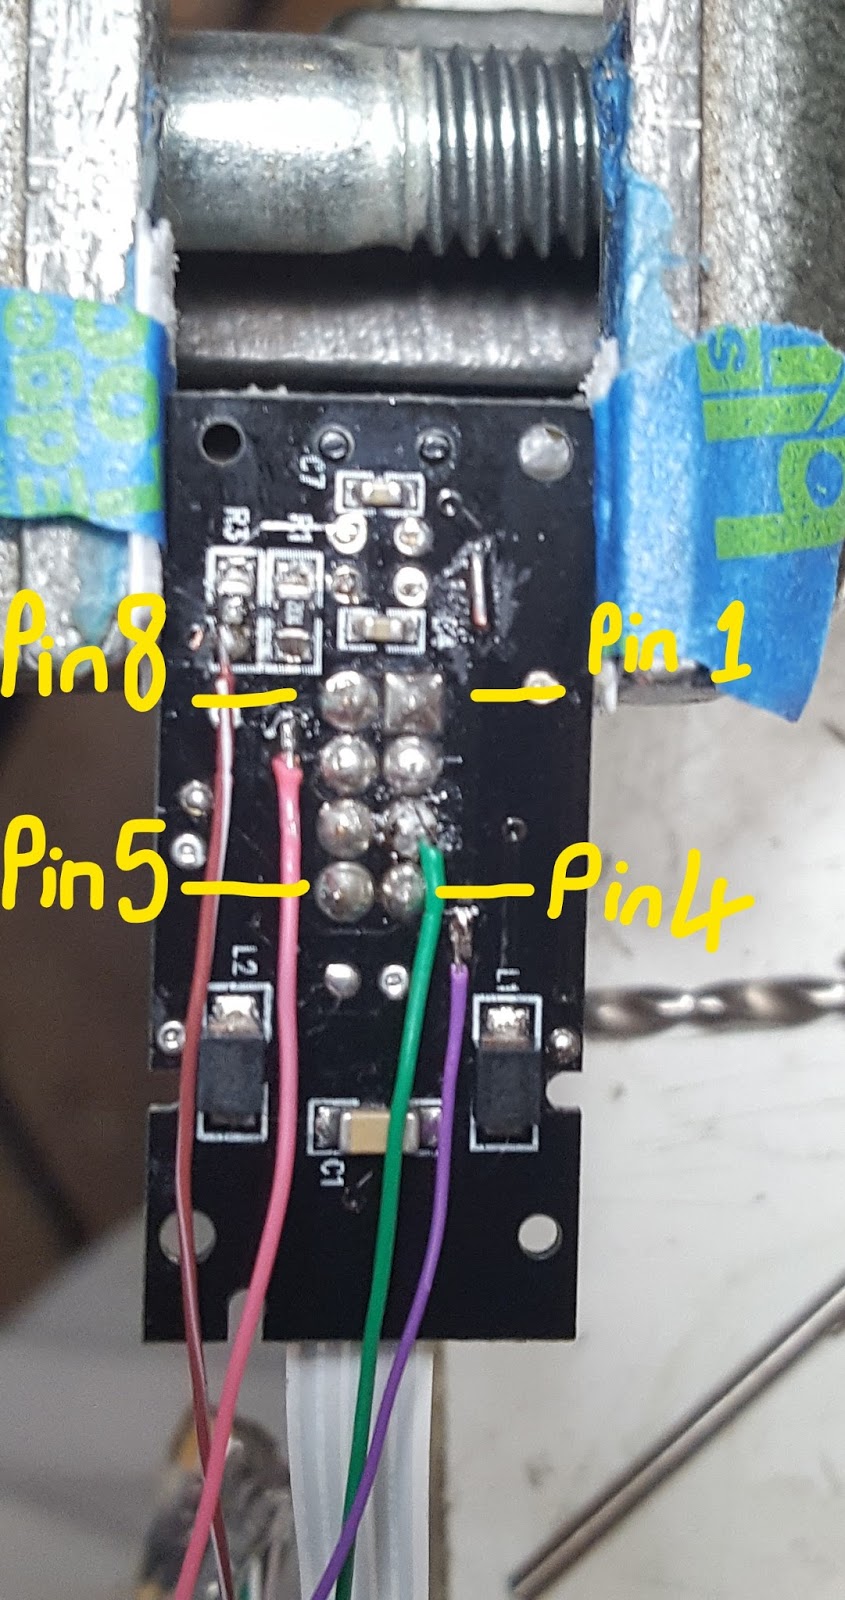
The soldered wire goes to one of the DCC decoder's function output (its the green wire soldered to Pin 3 in the photo below) and controls the white marker well, thats that board covered - pretty simple really - unfortunately the other board is a bit more involved.
Board 2
As can be seen by the above photo, to modify this board requires soldering 4 wires, as well as cutting 3 traces, they are better shown in the below photo.

Though the cuts can be in undertaken in any order, I've numbered the cuts 1 to 3 for clarity
- Cut # 1 is next to the resistor marked R3, the cut is made on the trace between the resistor and the plated through hole that feeds power to the headlight pad on the top of the board, this cut will isolate the feed between the headlight and the white marker lights, The headlight gets its feed from the Pin 2, and the white markers get their power from the brown wire soldered to the base of resistor R3 (making sure you do not solder the cut trace back together), this wire is then connected to one of the decoder's functions outputs (F1 to F4)
- Cut # 2 is made to the trace that comes from pin 6, this feeds the Red markers on this board and the headlight in the board (previously modified) at the other end of the model. Solder a wire (Pink in the above photo) to the base of resistor R2 (or to the cut trace as I've done), this wire is then connected to one of the decoder's functions outputs (F1 to F4) and provides power to the Red markers.
- Cut # 3 is on the trace that come from Pin 2 of the 8 pin DCC plug and isolates the trace going back to the interboard connector, it can probably be cut closer to where it joins onto Pin 2, to the isolated section of this trace is soldered the purple/violet wire which is then connected to one of the decoder's functions outputs (F1 to F4) and will power the Red markers in the other end of the model.
I've also drilled a couple of holes (about 2mm or so) as indicated in the board, these are used to feed the wires that have been soldered to the board from one side to the other, be careful when drilling these holes that you don't drill through the traces.
Speakers - now a decision has to be made as to what one want to do with the speaker, as I see it there are 3 options
- keep the existing speaker
- replace the speaker in the same location
- replace the speaker in a different location - probably under the roof
 |
| Existing speaker removed from the fuel tank and a sugarcube speaker trial fitted |
That just about covers the 41 class, all that remains is to re-assemble the model and enjoy.
And a couple of photos to finish with showing the end result.
 |
| Headlight Only |
 |
| White Makers Only |
 |
| Headlight and White Markers |
 |
| Red Markers Only |
Auscision 43

OK, So now that's done lets get onto modifying the 43 to make the lights work independently.
Whilst the 43 class is somewhat simpler than the 41, it still requires for some delicate soldering.
The first thing I did was to disconnect the wires that come from the light switches in the fuel tank as I think they are not needed for DCC.
The rear marker lights need little work as the Red & White markers are individually wired and its simply a matter of connecting the right wire to the right decoder point, ie. each LED has both a Positive and a Negative wire, on my model the LEDs are wired as follows :
- For the White LED the White wire is the negative and the yellow wire is the positive ground
- For the Red LED the Brown wire is the negative and the Blue wire is the positive common
The front lights on the other hand need a bit of work, not as much as the 41, but still some work to do.
The main work on the front lights occurs in the front headlight board and is mainly just a matter of un-soldering and then re-soldering a couple of wires and cutting some traces.
The first thing to do is to remove the headlight enclosure from the chassis, this is achieved by simply using a small screw driver between the enclosure and the chassis to prise the enclosure away from the chassis mine came away fairly easily, then remove the PCB/Lightboard from the enclosure, mine was held together by a couple of spots of glue. This will expose the lightboard to enable it to be worked on.

You will have noticed that there are 4 wires to the light board, for my model the original wiring layout was :
- the Blue wire was the positive for the Red LED & the top White LED,
- the Brown wire was the negative for Red LED,
- the White wire was the negative for both White LEDs
- the Yellow wire was the positive to the bottom White LED.
I'll start with the back of the light board first, this is the side that has the resistor (not the LEDs), the first step is to cut the trace between the 2 resistors on the left hand side of the board as indicated in the photo below and then remove & re-solder the Yellow as shown with the wire soldered to the solder pad AND the resistor (this is done because we cut the trace from this Pad to the joined Red & White LEDs it originally went to), this will provide the negative feed to the bottom White headlight LED (the lower of the 2 Yellow coloured LEDs) . The Blue wire is soldered to the pad above the Pad the Yellow wire is soldered to.
 |
| Rear of Lightboard |
 |
| Front of Lightboard |
The front of the lightboard contains the LEDs, they are grouped as the Red markers LED (the clear white looking LED in the top in the right hand side above photo) then the White markers LED in the middle and the Headlight LED below that (ie.the 2 Yellow coloured LEDs).

The first thing is to cut the trace between the pad the Yellow wire is soldered to and the middle LED then, using a thin piece of wire, solder a link between the 2 Yellow LEDs, this forms the common positive connection between the 3 LEDs, the top 2 LEDs have a trace joining them and the link joins them to the bottom LED, which is connected via a trace from the Pad the blue wire is soldered to. When soldering the link wire make sure you do not short it out against the plated through hole below the lower White(Yellow) LED (its the negative feed to the bottom White LED (the headlight LED) which comes from the Yellow wire which was previously soldered to the resistor).
When testing the lights I had a fair bit of light bleed through from the markers to the headlight, and whilst not very prototypical I must admit that when the Red markers were turned on I did like the dim RED headlights - kinda looked wicked, not very real, but wicked.
 |
| Those wicked looking Red headlights |
 |
| Alfoil strip glued to the light enclosure |
The rest off the install was a fairly standard job, a couple of things to note though.
I did not use a 21 pin decoder, mainly because I had a 'normal' decoder handy
Firstly I used the existing Auscision electrical board as a base to put the DCC decoder onto. I stripped the Auscision board of all it's electrical components, including the 21 pin plug but did not interfere with the traces running from one end to the other so I could use them for the common positive and the track left & right between the 2 ends.
I installed a platform above the front bogie made from some scrap 20th styrene for the capacitor to attach to
I used an iPhone 6 speaker to see what it sounded like, and whilst I do like it, I think the sound is not really any different to the sound from the sugarcube speakers used in the 40, 41 & 82 installations described previously.
 |
| DCC Decoder etc in Auscision 43 class |
So a couple of photos showing the lights.
 |
| White Markers Only |
 |
| Red Markers |
 |
| Headlights Only |
 |
| Headlights and white markers |
Great series on how to do these mods. I'm about to start on a 43. First question - how does one extract the light boards at each end? Is there a trick, or do you just prise them out of the chassis with a small screwdriver?
ReplyDeleteCheers,
Lindsay
So I went with prising the grey plastic cap off, and then the board came out easily.
ReplyDeleteLooks like a difference on my 43. #2 end has white LED with white wire to function OP, yellow common. Red LED has blue to function OP, brown common. Yellow and brown wires are joined on the motherboard.
I assume you just disconnect at the motherboard pads and then reconnect at the appropriate Loksound output / common pad?
Cheers,
Lindsay
So I got the front lights on the 43 working fine: dimmable headlight, independent red & white markers.
ReplyDeleteOn the rear, I got the white markers OK (basically they are running on the rear headlight function output) but I can't get the red markers. When wire like a normal lighting output (AUX1 or 2) nothing happened. I tried adding an amplifier to the AUX4 output - they were always on, regardless of the state of the mapped function button. Then I tried wiring them opposte to normal AUX i.e. from AUX4 to light board +, lightboard - to ground: no lights, regardless of the state of the mapped function button.
Frustrated!
Hi Railmod. Any chance I could contact you - I'm about to build a layout in N Scale of the Mudgee yards in 1945. Would really like some of you input as you know there is very little available
ReplyDeleteCheers