Saturday, November 26, 2016

Track Laying almost done

Now that my version of  the Southern Aurora is done & dusted I've gone back to the layout which I have not done any real work on since starting the Southern Aurora and it does need a lot of TLC, also with me hosting  a meeting here recently (Yesterday) it was a good deadline to work to to get some more stuff done on the layout.

I've had a bit of a track laying spurt over the last few months, the track for my version of Dunedoo is now laid, the servo point motors have been installed and the track from Dunedoo to Binnaway (Staging) is laid, I do have to make the Binnaway staging yard though, which will be based on a sector plate and the final (Up/East) staging yard (which will be in the return loop near Liverpool).

Looking from the Mudgee end into Dunedoo, 
The station building is actually based on Gulgong (which I was going  to model originally but I then realised I did not really have the room for it), I'm in two minds whether to make another station building based on the real thing or just use this. The Silos were started many moons ago  but I've recently re-started on them, I've built the scale annex and loading road, still heaps to do though, I'll be using Keiran Ryan's Etch parts (KRModels Silo Details Etch) to detail the silo with.

Looking from part way along the Binnaway end of the yard, the loading bank will have to be modified to fit the space

Looking from the Binnaway end of the yard, the Yellow Golden Fleece tanker is on the siding that will serve the Oil depot via a remote unloading point and the stock wagons are parked on the stock road.


I've also made a new curved point to serve an oil depot, I made it using a templot plan
The Templot plan mounted on a board

I made the plan initially by rubbing the original track curve onto a piece of paper and then scanning & importing the rubbing/drawing into templot to then develop the point plan, then using the standard (for me) rail soldered to PCB method to make the point
The point built using the temmplot plan, the road to the left is the oil depot road, the 2 roads to the right are to serve the abattoir
Pretty happy with the resultant point & the rolling stock  seems to roll through it OK, though  they don't have very far to go & at bugger all speed so I guess not a real test for track laying skills.

Another job I undertook was to make the viaduct that sort off represents the Shepherd Street viaduct just south of Liverpool, it was made using a mix of 10mm and 5mm foamcore as the structural base

The foamcore core for the viaduct, pretty simple really


 and then overlaying with SouthEast finecast embossed styrene (they make an A3 size viaductsheet which is near enough for me to the Liverpool Viaduct)


Detailing bits & pieces added

 I used crosslinked PVA to glue the styrene to the foamcore and whilst it seems to have worked OK, I'm not convinced on the long term bond of the Styrene to the foamcore (Solvent based contact adhesive may have been better), the viaduct was then detailed (buttresses made, capping added etc, and arches lined) this was then sprayed with a yellow oxide (Cheap) spray can

sprayed with (Cheap) yellow oxide


 and then drybrushed with various tones of browns and reds and then overstamped with the same colours using an offcut of a kitchen sponge, not sure whether to give the viaduct a final overall wash to tie it all in or not.


Drybrushed and 'pad/sponge' painted.

I'm pretty happy with the end result, and its first time I've attempted something like this and it has been a great learning experience.

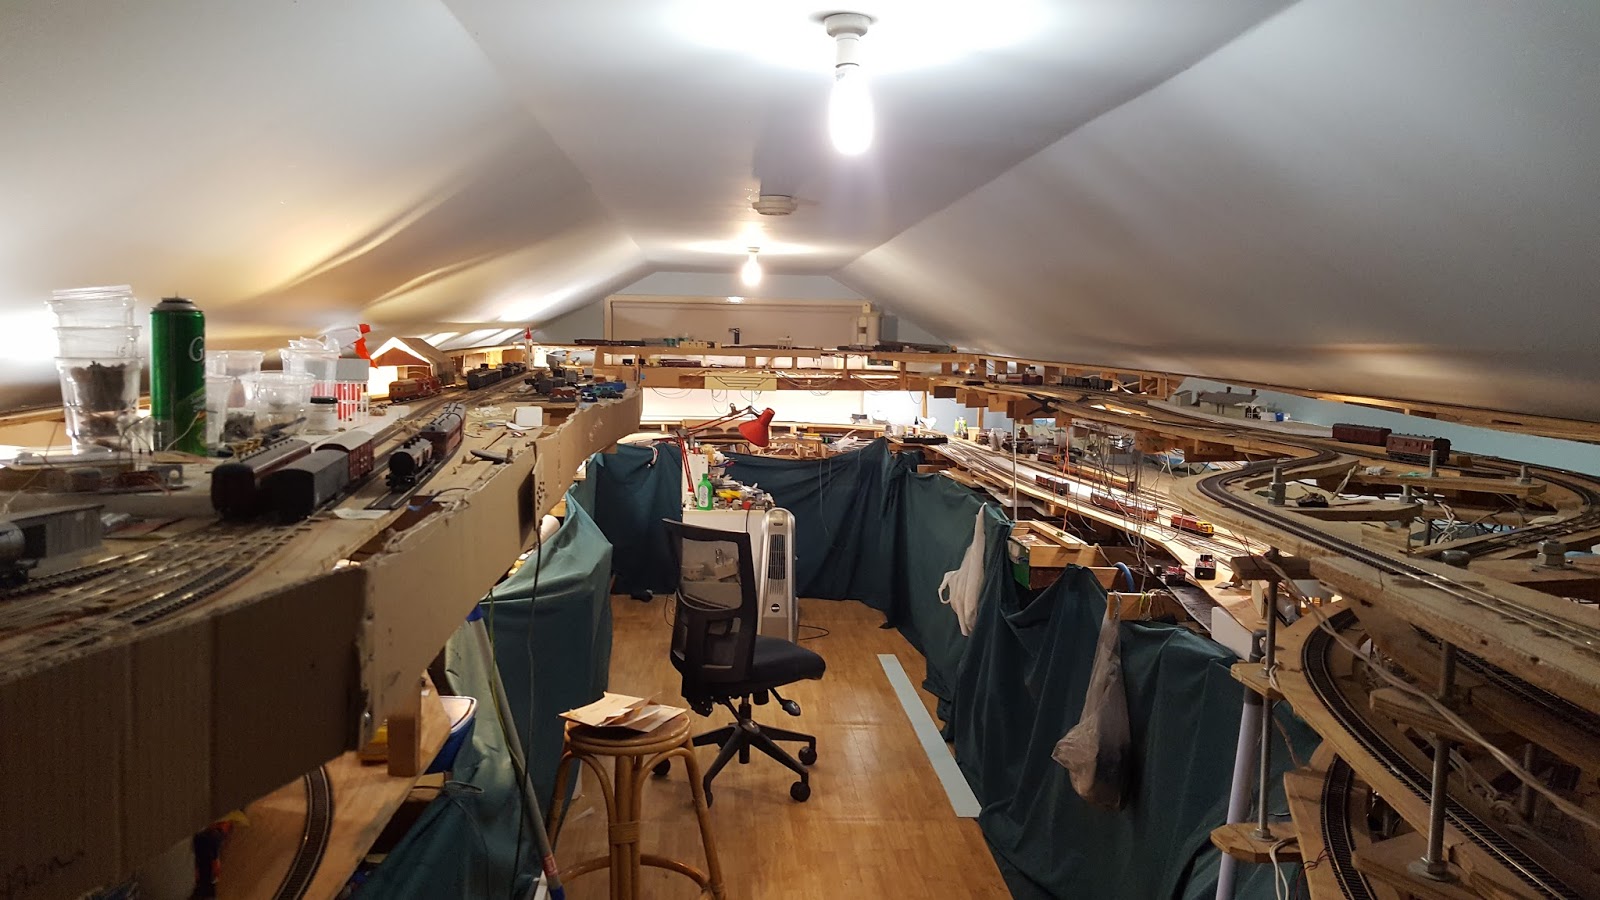
Then I had to clear the layout of all the junk currently strewn over it to get it running for a meeting I just had here, so this is the cleanest the layout has been for quite a while And I CAN run trains again - always a good thing, but somehow I don't think it will stay that way, but hopefully it won't get as untidy as what it was and I'll be able to continue running trains.
Overall view of the bottom deck of the layout - I can see a floor :-)

Overall view of the top deck of the layout - Dunedoo is right at the back against the rear wall/window
Whilst the guys were here I discussed the hiding of the back roads from Mudgee to Dunedoo & from Dunedoo to the staging yard as I did not want them to be part of the scene - then one of the guys (thank you Geoff S.) said why not just make the back drop smaller cause there is a ready made 'sky' backdrop in the blue ceiling so just hide the tracks. So I experimented by cutting down one of the backdrops and am quite pleased with the results, the following few photos show the results using the track going from Dunedoo to staging/Binnaway etc.

No backdrop - Portland in the foreground and the track from Dunedoo to Binnaway (stage) in the background (its the rearmost track and you can just make out the Silo @ Dunedoo) The trackbed leading down behind the station is for a small Narrow Gauge (HOn30) line

Original Backdrop temporarily added - whilst the trains would not be visible behind the backdrop any derailed trains would have to be retrieved from under the layout with some gymnastic involved, and I'm getting too old for gymnastics.


The 'new' shorter backdrop taken from roughly the same location as the previous photo


Same location as above photo, but with the SHO on the  track


Closer view of the cutdown backdrop - note that tracks are not visible which is the main effect I was after

Closer view of the cutdown backdrop with SHO carriage on the track
The photo with the SHO on the back track shows that whilst noticeable & does intrude into the scene, it is not really that bad and trains will not all that often be on the back track so no real biggie & the track is not noticeable when no trains are on it which in an ops session would be the norm more often than not.

I'll probably end up making the top a bit wavy so it's not too 'solid' a line and thus will hopefully not draw the eye to it and also will be covering the 'backdrop' with foilage (trees/shrubs etc)  leaving the ceiling to represent the sky, well that the current plan.

The next  few step will be around the points/switches, one will be to setup the TAM Valley point controllers to use them as an accessory decoder via DCC, the other main thing I have to do is to re-visit the main staging yard points as they were some of the first point I made and I'm not happy with their layout, nor the way they move (too stiff), once they've been re-done I'll then leave the track laying for  while, hopefully run the layout & iron out any bugs I can see & I can already see some track has buckled in the recent hot days we've had.

Well, that's it for now, so until next time.

Sunday, January 3, 2016

Southern Aurora Finally finished

My Southern Aurora's Inaugural Run on the Mudgee Line.


 Double 44's, hauling the Southern Aurora the way it should be, though they are a bit too clean.
 
Passing Portland Station on the UP.   


If you look real hard you might be able to see the revelers enjoying themselves in the Lounge Car.


Well its been a long time coming but finally my version of the Southern Aurora  following Ian Blacks Article is done and had its inaugural run on my layout.

A comment was made in one of the previous posts as to what paint I'd be using to paint the models & I said I would be using the Stainless Steel colour from the Alclad 2 range. I had read up on using this system and the main point is to undercoat the model in a gloss black which is then top coated with mist coats of the final colour, and then a clear coat, but whilst doing a bit of research I came across an article by Antonio Santana (Link to Stainless Steel colour article) where he outlined his findings on using the Alclad 2 system and he found out that he got a better finish using a gloss dark gray undercoat rather than a gloss black undercoat with Chrome as the final colour (he has also written an article in the Sep. 2013 Model Railroad Hobbyist magazine (Link to model-railroad-hobbyist magazine 2013-September), when looking at the photos in his article I thought the models looked too shiny compared to what I have seen of the Southern Aurora where the stainless looks a bit duller so I experimented on a spare Lima Indian Pacific car I had with the gloss dark gray and a gloss black with the stainless steel colour over the top. I showed the end result to a few friends, both in the hobby and outside of the hobby and they all said they preferred the stainless over the dark gray base coat, (in the photo below  the Gray base coat on the left hand side, the Black base coat is on the right hand side) its more noticeable in real life and the side that has the black base coat is noticeably darker.


Hard to see in the photos but certainly noticeable in real life, the Black undercoat is on the right and results in a darker stainless colour than the grey undercoat.

The colour I used for the base coat was a Mr Colour Engine Gray (#339) (and yes I bought it from BNA Model World - no association with them except for a happy customer)


, though I did run low so added some gloss black to extend it & so the final gray is quite a bit darker than the original test, though this does not seem to have affected the final outcome, one of each of the models in their undercoat grey and their corresponding finished stainless steel  are below.
Plain Engine Gray (#339) on left and the Black & Gray mix on right


Same models showing the stainless over the base coats - not much difference between the 2 grays


 MHN


 NAM


 RMS


BCS


LAN


PHN


MBK

And off course the Southern Aurora also had a car transporter, so my one had to have one too, this is based on the Strath Hobbies BKX, only real modification I've made to the kit is gluing the Motorail & NSWR nameboards  appropriately and replacing the bogies with a set of 2CM bogies from SDS models (Thanks Steve).

My method of painting the models was to give them a good scrub with Gumption and an electric toothbrush, followed by Mr Colour 1000 Surfacer (Primer),


I then touched up any areas I was not happy with,  again I scrubbed with gumption & the toothbrush, then the dark gray undercoat & finally the stainless steel topcoat.
A word of warning/advise about the Alclad 2 paint - it gives a result that I am very happy with - I like the look of it, BUT it is very unforgiving if there are any minor blemishes, as an example where I joined the roof pieces together to get the roof I wanted the paint highlights where it was joined or where the original 'silver' paint was rubbed back and even though it was primed and undercoated with gloss gray and it looked OK, the final Alclad 2 top coat showed off where the join was made, on another car I accidentally dropped a bit of thinners (I used as glue) on the side corrugations, this caused the Lima 'silver' paint to craze & even though I rubbed it back and primed over it still shows though, so it is good stuff but one has to be careful, in hindsight I probably should have stripped the original paint off, but I will use this again where needed.

I used one of my cars whilst experimenting the the decals, this led to the silver 'rubbing off' around some of the window frames due to handling the model which had not being clearcoated as yet I've tried to highlight with a red circle the area in question in the following photo 


easy enough fix - simply mask over the silver with some 'Blue' tape and re-sprayed, or so I thought, looks like the silver paint 'lifted' when he tape was pulled off a few hours after it was applied hopefully one can make out where the paint lifted off, again highlighted with a red circle - BUT - be careful as even though the models have been clearcoated the silver still rubbed off slightly whilst fitting the windows - lesson learnt - fit (but don't glue) all windows before painting, then remove windows & then paint the body so as to lessen the handing of the painted model - too late for these models but a learning point for the next models I have a go at.


The Alclad 2 comes pre-thinned and I got about 2 3/4 cars per bottle. this was top coated with the Alcad 2 clear basecoat after the models where decalled. Talking about the decals, I got them from Geoff @ Custom Hobby Decals (www.customhobbydecals.com), again just a happy customer. As luck had it Geoff was making some new signs for some real Southern Aurora cars & so we where able to piggy back of them, supplementing them with some photos & measurements I had previously taken when researching the cars down at ARHS ACT which Geoff used to make the remaining decals, so if anyone needs a full set of Southern Aurora decals then Geoff's your man, I believe that Casula Hobbies stock them. The decals are pretty easy to apply, but not like what I am normally use to, but if you follow Geoff's instruction (I let them soak for about 30 seconds and then peel them of the backing sheets) then they go on easily, please note that the decals are 'cut' around the perimeter saving the hassal of having to accurately trim them oneself. I am thinking that with the Alclad paint that I should have clearcoated the models before decalling, as well as after, so the decals have a nice glossy surface to adhere to.

I bought all my paint from BNA Model world, no association with them, but they had all I needed (including some model car stuff), I believe that Kellets in Liverpool, NSW also stock the Mr Colour range of paints, not sure about the Alclad 2 paints.

Windows are made from 1mm poly-carbonate I found when up in Coffs Harbour a few years back, but any plastics supplier should have it, it was cut using the cut & snap method, similar to styrene, it was then finally shaped with a file to suit, pretty easy material to work with & I like the end result.

All the cars have interior lighting, one of the end cars has a home made DCC decoder driving the marker lights and the lit Southern Aurora sign (which is attached to either the PHN or MHN depending on direction of travel), the other car simply has the marker lights LED in series with the 'Southern Aurora' sign LED which means if the sign is not connected then the markers do not light up, pretty simple really, the sign is connected to the carriages via IC sockets.  This is visible in the below photo of the MHN, the IC sockets are the 2 small holes mid way down the end, they are not that noticeable on the model and the car that does not have the sign is normally next to the loco & thus even less noticeable.


A photo of the lit end is at the end of this blog.
Talking about the lit nameboard, I used a photo I had taken at Central a few years back as a mask to create it in Corel Draw, this was then printed on a colour laser copier onto decal paper a couple of times, then I applied one decal to the nameboard, and tested it when dry, this showed that the light bled through too brightly and was very visible through the blue, I then over painted the blue with a gloss black (being careful not to get it onto the actual lettering)  and when dry with a gloss white, and then applied a second decal over the top, this pretty well stopped the light bleeding through.

The rest of the cars a have simple circuit I found on the web by Jim Betz that uses a Bridge rectifier, a zener diode and resistors (as pictured below, photo from Jm Betz's site) to power the LEDs (Flicker Free Lighting Circuit), - just make sure you cut the tracks as appropriate, I didn't & let the magic smoke out of the various components :-(


All bogies have electrical pickup, the 2BS are from Eureka (as used in their HUB set) and come with inbuilt pickup, the 2BU are modified Lima bogies with pickup via brass bearing and soldered connections to them, not the best but seems to work, BTW I ended up just soldering all the components together bypassing the use of the circuit board which made it a much more compact package.

Anyways, thats it for now and ends the saga of my build of the Southern Aurora cars, its been a long but enjoyable project & I've learnt heaps which I hope I can apply to other modelling projects, all thats left now is just a few pictures to finish off with and to wish all a Happy New Year.


 On Colo Vale on it's first trip

At the Oct 2015 Sydney Exhibition at Liverpool on the Epping MRC Binalong Layout.


At speed passing through Binalong

Who's that knocking at the door ...


The END